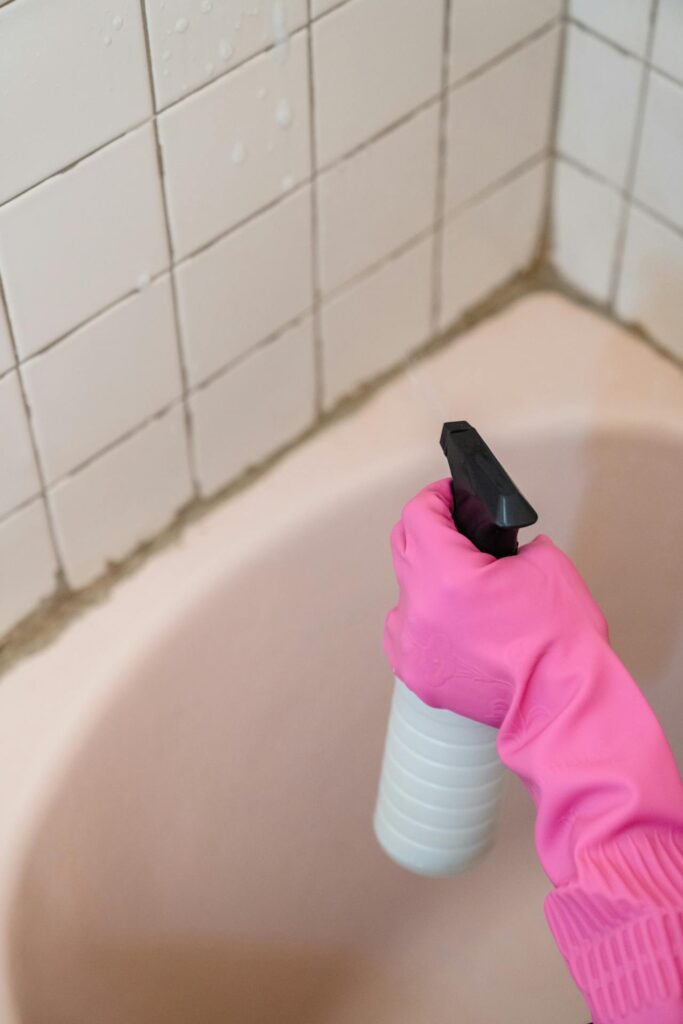
Shower tiles can build up soap scum, hard water stains, and mildew faster than expected. The good news? Deep cleaning doesn’t require aggressive scrubbing or hours of elbow grease. With the right approach and a few simple techniques, those tiles can look refreshed without wearing out your arms in the process.
These steps are designed for routine deep cleaning and light to moderate buildup, not severely neglected showers.
Why Gentle Methods Work Better
Harsh scrubbing can actually damage grout and tile surfaces over time. Letting cleaning solutions do the heavy lifting preserves the finish while still breaking down surface buildup effectively. The key is giving products enough time to work their magic before wiping them away.
1. Start with a Hot Water Rinse
Turn the shower on hot for a few minutes before cleaning. The steam and heat help loosen surface grime and open up the pores in grout lines. This simple prep step makes the rest of the process more effective.
Once the tiles are warm and slightly damp, turn off the water and get ready for the next phase.
2. Mix a Paste with Baking Soda and Dish Soap
Combine three parts baking soda with one part dish soap to create a thick paste. This mixture is mildly abrasive enough to tackle buildup without scratching surfaces. The dish soap cuts through grease and soap residue while the baking soda provides gentle scrubbing power.
Apply the paste to tile surfaces and grout lines using a damp sponge or cloth. Don’t rub hard yet—just spread it evenly across problem areas.
3. Spray White Vinegar Over the Paste
Once the baking soda paste is applied, spray white vinegar directly onto it. The bubbling reaction helps lift and loosen surface buildup, making residue easier to wipe away after soaking. Let this combination sit for 10 to 15 minutes while it does the work.
The longer contact time means less manual effort needed later. Just keep in mind that ventilation helps, so turn on the bathroom fan if possible.
Avoid vinegar on natural stone tiles like marble, travertine, or limestone, as acid can damage the surface.
4. Use a Soft Brush on Grout Lines
After the solution has sat, take a soft-bristled brush and gently work it along grout lines. Focus on small sections at a time rather than trying to cover everything at once. The chemical reaction has already loosened most of the grime, so light pressure is all that’s needed.
An old toothbrush works effectively for tight corners and detailed areas. No need to scrub like you’re sanding wood—steady, gentle strokes get the job done.
5. Wipe Down with a Microfiber Cloth
Grab a damp microfiber cloth and wipe away the paste and loosened debris. These cloths trap particles instead of just pushing them around, which makes cleanup faster and more thorough. Rinse the cloth frequently in clean water to avoid spreading residue back onto the tiles.
For stubborn spots that didn’t fully lift, reapply a small amount of the paste and vinegar combo to those areas specifically. Let it sit for another five minutes before wiping again.
6. Rinse Everything Thoroughly
Use warm water to rinse all surfaces completely. Any leftover cleaning solution can leave a filmy residue or attract new dirt more quickly. A handheld showerhead makes this step easier, but a cup or spray bottle works fine too.
Pay extra attention to grout lines where solution can hide. Run your hand along the tiles after rinsing—they should feel smooth, not sticky or slick.
7. Dry Tiles to Prevent New Buildup
Use a squeegee or dry towel to remove excess water from tiles and glass. This final step prevents water spots and slows down the formation of new soap scum and mildew between cleanings. It takes less than two minutes but makes a noticeable difference in how long the clean lasts.
Leaving tiles wet makes it easier for grime to come back quickly. A quick dry-down keeps things looking fresh between deep cleans.
What to Skip
Avoid using bleach and vinegar together—they create harmful fumes that aren’t worth the risk. Stick with one or the other, not both in the same cleaning session.
Skip steel wool or rough scouring pads on ceramic or porcelain tiles. They can scratch the glaze and create tiny grooves where dirt gets trapped more easily. Soft brushes and cloths do the job without the damage.
Don’t forget about your shower curtain or door. Cleaning tiles while leaving other surfaces grimy just makes the space look half-finished.
Keep It Fresh
For routine deep cleaning and ongoing maintenance, shower tiles don’t have to require exhausting scrubbing sessions or expensive chemical cleaners. With these gentle methods, the cleaners loosen buildup so you can clean with less effort.