Installing a floating shelf above your washer transforms wasted vertical space into valuable storage while keeping your laundry essentials within easy reach. This practical upgrade maximizes your laundry room’s functionality without requiring major renovations or expensive furniture.
Why Install a Floating Shelf Above Your Washer?
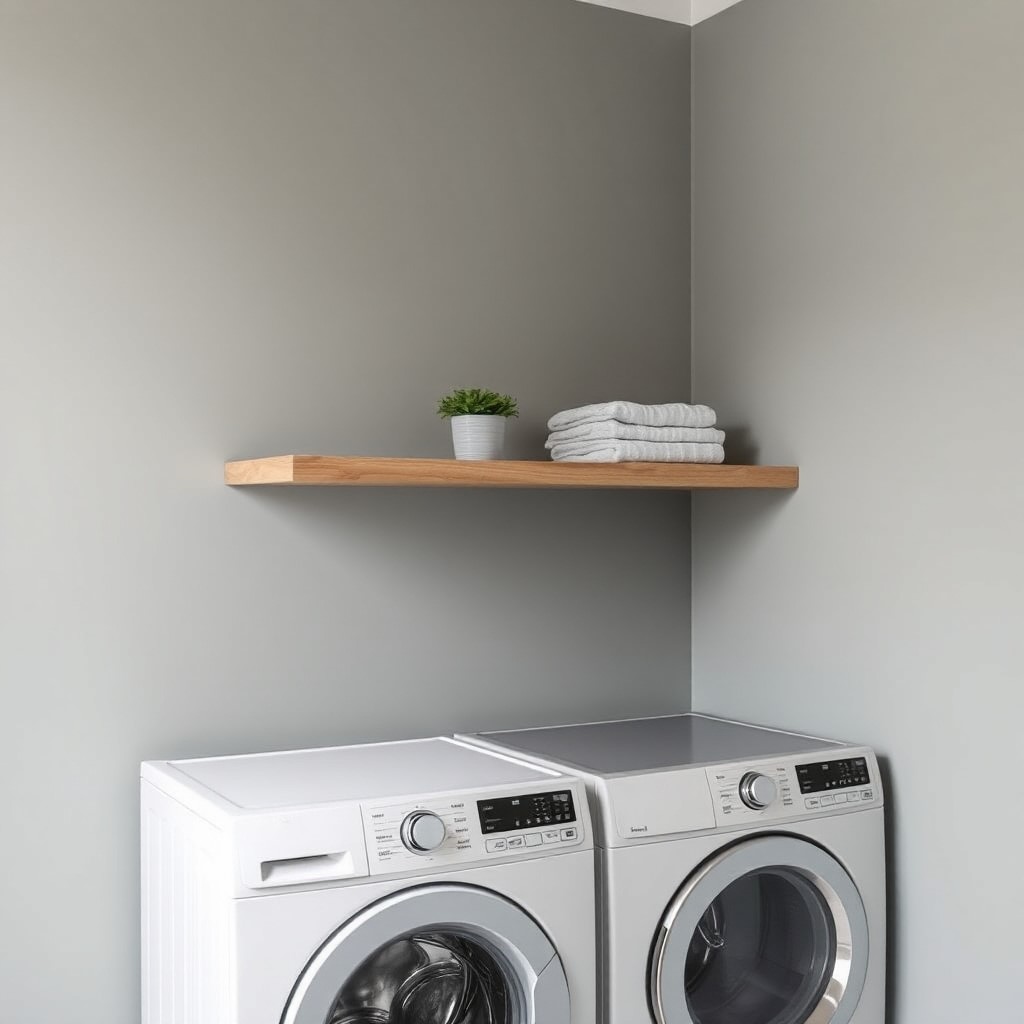
Laundry rooms often suffer from limited storage space, leaving detergents, fabric softeners, and cleaning supplies scattered across countertops or stuffed into overcrowded cabinets. A floating shelf above your washer solves this problem by utilizing the empty wall space that typically goes unused.
This simple addition provides immediate benefits: organized storage for frequently used items, easier access to supplies while doing laundry, and a cleaner appearance in your laundry area. Unlike bulky cabinets or standing shelves, floating shelves maintain an open feel while delivering maximum storage capacity.
Essential Tools and Materials
Before starting your floating shelf project, gather these necessary tools:
Tools Required:
- Stud finder
- Level (24-inch recommended)
- Drill with bits
- Screwdriver
- Measuring tape
- Pencil for marking
- Safety glasses
Materials Needed:
- Floating shelf bracket system (heavy-duty recommended)
- Wood shelf (1×8 or 1×10 pine, oak, or MDF)
- Wood screws (3-inch for studs)
- Wall anchors (if studs unavailable)
- Wood stain or paint (optional)
- Sandpaper (120 and 220 grit)
Choose brackets rated for your intended load – quality floating shelf brackets typically support 40-50 pounds per wall stud when properly installed.
Step-by-Step Installation Process
Step 1: Measure and Plan Your Shelf Placement
Determine the optimal height for your floating shelf above your washer. Most installations work well at 12-18 inches above the washer top, though this can extend to 24 inches depending on your reach and the washer’s lid clearance requirements.
Measure your washer’s width and add 6-12 inches on each side for visual balance. Standard washers are 27-28 inches wide, so a 36-42 inch shelf works well for most installations.
Step 2: Locate Wall Studs
Finding studs is crucial for a secure floating shelf installation. Use your stud finder to locate at least two studs within your planned shelf area. Mark stud locations with light pencil marks.
If studs don’t align with your desired shelf placement, consider adjusting the shelf position or using heavy-duty wall anchors rated for your shelf’s expected load.
Step 3: Mark Bracket Positions
Hold your floating shelf bracket against the wall at your marked height. Use your level to ensure perfect alignment before marking screw holes. Double-check measurements and level placement before drilling.
Mark all bracket positions clearly, as precise placement prevents shelf sagging and ensures professional results.
Step 4: Drill Pilot Holes and Install Brackets
Drill pilot holes at your marked locations to prevent wood splitting and ensure accurate screw placement. For stud mounting, use 3-inch wood screws that penetrate at least 1.5 inches into the stud.
Install brackets securely, checking that each bracket sits flush against the wall. Loose brackets compromise the entire shelf system’s stability.
Step 5: Prepare and Install Your Shelf
If desired, sand your shelf board starting with 120-grit sandpaper, then finishing with 220-grit for smoothness. Apply stain or paint according to manufacturer instructions and allow complete drying.
Slide the shelf onto the installed brackets, ensuring it sits securely and remains level. Test the shelf’s stability before adding any items.
Safety Considerations and Weight Limits
Never exceed your bracket system’s weight rating. Quality floating shelf brackets support 40-50 pounds per wall stud when properly installed. Heavy-duty systems can support 75 pounds or more per stud connection.
Distribute weight evenly across the shelf to prevent sagging or bracket failure. Place heavier items like large detergent bottles closer to bracket locations rather than at the shelf’s center or ends.
Consider the washer’s vibration when selecting bracket systems. Choose brackets with secure mounting systems that won’t loosen over time due to machine movement.
Styling and Organization Tips
Organize items by frequency of use, placing daily essentials like detergent and fabric softener within easy reach. Store occasionally used items like stain removers or specialty cleaners toward the back or sides.
Use attractive storage containers to corral small items like dryer sheets, clothespins, or laundry pods. Clear containers allow easy identification while maintaining a tidy appearance.
Group similar items together and maintain consistent spacing between products for a clean, organized look that makes finding supplies quick and effortless.
Installation Mistakes to Avoid
Skipping the stud finder leads to inadequate support and potential shelf failure. Always locate and use wall studs when possible, especially for shelves that will hold significant weight.
Installing brackets without checking level results in sloped shelves that look unprofessional and may cause items to slide off. Take time to verify level placement at each step.
Choosing inadequate brackets for your intended load creates safety hazards. Select brackets rated well above your expected weight requirements to ensure long-term reliability.
Ignoring washer clearance can interfere with lid operation or create maintenance access problems. Maintain adequate clearance above your washer for normal operation and service needs.
Maintenance and Care
Regular cleaning keeps your floating shelf looking its best and functioning properly. Wipe down the shelf monthly with appropriate cleaners based on your chosen finish.
Check bracket tightness every few months, especially if you notice any shelf movement or sagging. Tighten screws as needed to maintain secure mounting.
Inspect the shelf regularly for signs of overloading, such as sagging or bracket stress. Reduce weight if you notice any structural concerns.
Questions & Answers
How much weight can a floating shelf above my washer safely hold?
Quality floating shelves properly installed into wall studs can safely support 40-50 pounds per stud connection. Heavy-duty bracket systems may support 75 pounds or more per stud. Always check your specific bracket’s weight rating and distribute items evenly across the shelf.
What’s the ideal height to install a floating shelf above my washer?
The optimal height is typically 12-18 inches above your washer’s top surface, though this can extend to 24 inches based on your reach and lid clearance needs. This provides comfortable access to stored items while maintaining adequate clearance for loading laundry and washer operation.
Can I install a floating shelf if I can’t find wall studs?
Yes, but you’ll need heavy-duty wall anchors rated for your shelf’s intended load. Toggle bolts or heavy-duty drywall anchors work for lighter loads, but stud mounting provides the most secure installation for heavier storage needs.
Will washer vibration affect my floating shelf?
Properly installed floating shelves should withstand normal washer vibration. Choose quality brackets with secure mounting hardware, and ensure all screws are tightened properly. Excessive vibration may indicate washer leveling issues that should be addressed.
What type of wood works best for a laundry room floating shelf?
Pine, oak, and MDF all work well for laundry room shelves. Pine offers affordability and easy customization, oak provides durability and natural beauty, while MDF delivers smooth finish potential at moderate cost. Choose based on your budget and desired appearance.
How do I prevent items from falling off my floating shelf?
Install the shelf level to prevent items from sliding, use storage containers with lips or walls to contain smaller items, and avoid overloading the shelf. Consider adding a small lip or rail to the shelf’s front edge for extra security.
Should I seal or finish my floating shelf for laundry room use?
Yes, finishing your shelf protects it from moisture and makes cleaning easier. Use appropriate wood stain, paint, or polyurethane finish based on your preferences and the shelf material. Proper finishing extends the shelf’s lifespan in humid laundry room conditions.